Getting familiar with the Windows 10 desktop and Start menu

In this session, you’ll understand the layout of the desktop and learn how to use and customise the Start menu and the taskbar to make them more personal to the way you work. You will still be able to access Mutualnet in the same way.

Get started

Skip to next session

Session at a glance

  • Understand the layout of the desktop
  • Open and navigate the Start menu
  • Review the taskbar, desktop and notification area
  • Launch applications
  • Customise the Start menu
  • Add application shortcuts to the taskbar and desktop
  • Set up your email signature

Get started

Skip to next session

Navigating the Start menu

To open the Start menu click the Start button in the lower left corner of the screen. It’s the button containing the white Windows logo.

Alternatively, from the keyboard, press the Windows key to the left of the space bar.

The Windows key which opens the Start menu

The Start menu will now be open.

Along the left edge of the menu are a number of shortcuts that let you shut down or restart Windows, change Windows’ settings, access your pictures and documents and change some device settings.

To the right of these is a list of recently added applications and all the other applications to which you have access.

To the right of this scrollable list is a panel of tiles which can also be used to launch applications.

The Start menu

Tip

To quickly navigate down through the application list to find a specific application, like Word for instance, first click one of the alphabetical letter titles, like A. Next select the first letter of the application’s name, like W. The applications starting with that letter will be at the top of the list. Now all you need do is click the application’s name, like Word.

Resize the Start menu

The Start menu can be resized. Open the Start menu and drag and drop the top edge of the menu until it’s the size you want.

Resize a tile

Tiles come in various sizes. Some application tiles have more size choices than others. To resize a tile, right click the tile, select Resize and select the size you want.

Resizing a Start menu tile

Move and group tiles

Tiles can be moved to any location within the tile area of the Start menu. Drag and drop the tile to your preferred location.

You’ll notice that the tiles are set out in groups. How you group them is up to you. To create a new group, drag a tile to a blank space on the Start menu and it will sit apart from the rest.

You can name a tile group by pointing to the space above the group to reveal the Name group text box. Click it and give the group a name. Naming the groups will help you manage the layout of your Start menu.

Naming a tile group within Start menu

Create an application tile

To add an application as a tile in the Start menu, right click the application in the list of available applications and select Pin to Start.

The application tile will be created. You may then wish to resize and reposition the tile.

Alternatively, you can simply drag the application shortcut from the list of applications and drop it alongside the other tiles in the Start menu.

The taskbar

The taskbar provides quick access to applications and the Search and Task View tools.

It makes sense that you customise the taskbar to include the applications that you use most.

The taskbar with Start, Search, Task view and Application shortcuts

Create an application shortcut on the taskbar

To pin an application to the taskbar, right click the application within the Start menu, select More and click Pin to taskbar.

Creating a taskbar shortcut from a Start menu application tile

The application shortcut will now appear on the taskbar.

Tip

The position of application shortcuts on the taskbar can be changed, all you need do is to drag and drop them, left or right.

The Notification area

The Notification area provides you with information that you may need from time to time, like the date and time, the volume of your device’s speakers, the network you are using and the status of your device’s battery – if you are using a mobile device.

You can interact with the tools in the Notification area by clicking them. The Volume tool, for instance, will show a slide bar which you can use to increase, decrease or mute the speaker.

You can also access Action Centre to review recent notification messages and interact with key settings, such as screen brightness etc.

Notification area with mouse hovering over Volume tool revealing current volume

Desktop shortcuts

The shortcut icons on the desktop can give you access to applications, folders, files and Web pages.

All you need do is double-click a shortcut and it will either launch the application or open the folder, file or Web page.

You can customise the desktop to contain your own shortcuts.

Create an application shortcut on the desktop

Drag the application shortcut from the list of applications in the Start menu and drop it on the desktop.

The application shortcut will now appear on the desktop.

You can drag the shortcut to any blank space on your desktop.

Remove an application tile from the Start menu

To remove a tile, open the Start menu, right click the tile you want to remove and select Unpin from Start.

Remove an application shortcut from the taskbar

To remove a shortcut from the taskbar, right click it and select Unpin from taskbar.

Unpinning an application shortcut from the taskbar

Remove an application shortcut from the desktop

To remove a shortcut from the desktop, right click it and select Delete.

Deleting an application shortcut from the Desktop

Tip

Removing an application shortcut or tile does not delete or uninstall the application, it simply deletes the shortcut to that application.

Set up your e-mail signature

Before you start to use Outlook to send email messages, make sure you set up your email signature. When creating your email signature, remember to refer to the brand guidelines that can be found on Mutualnet.

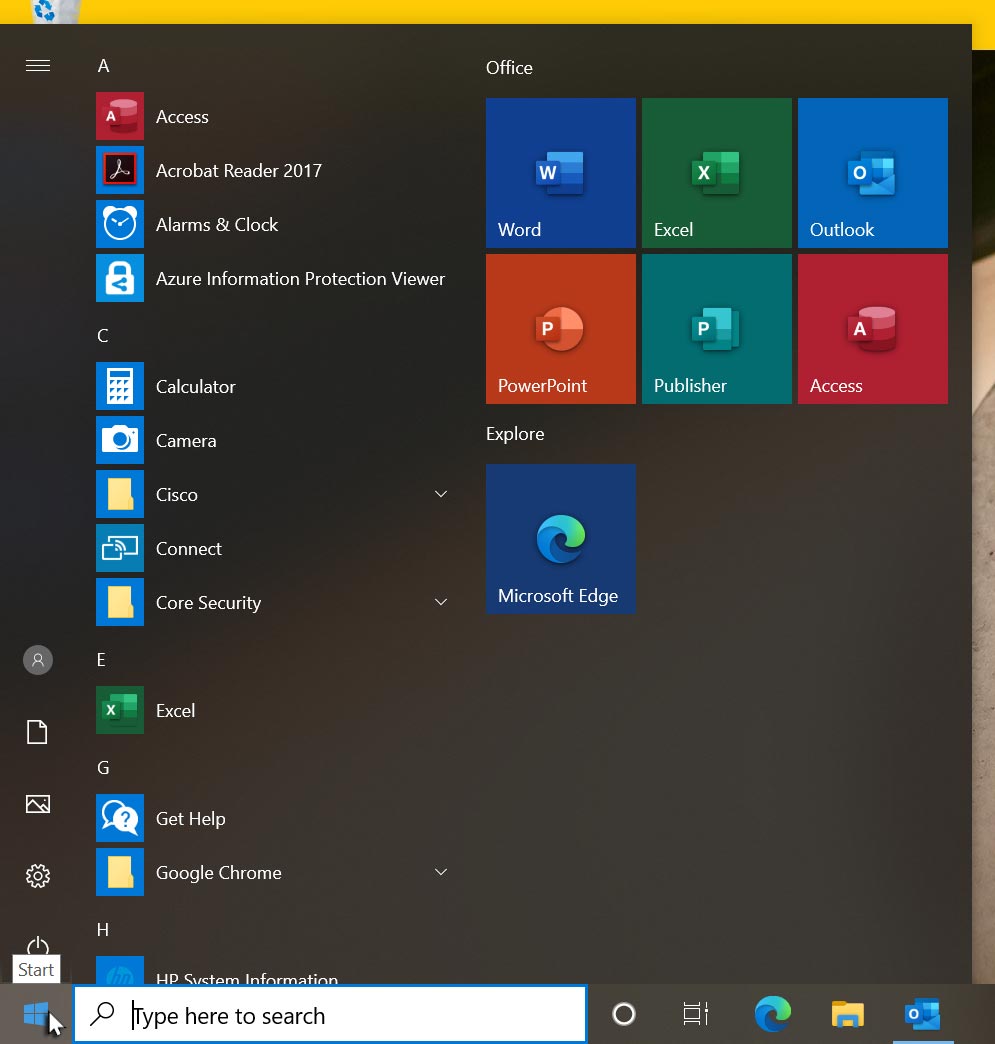
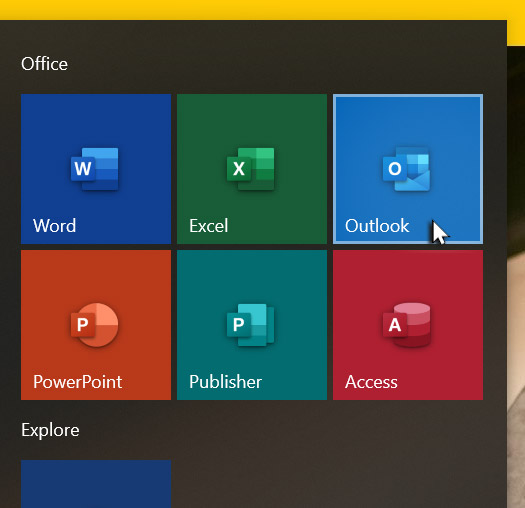
To launch Outlook, click Start and from the tiles to the right of the Start menu, click Outlook.

Launching Outlook from the Start menu

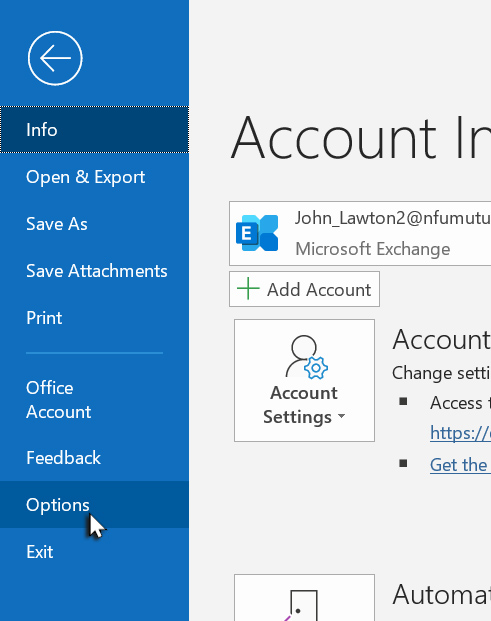
When Outlook has started, click the File tab and from the left hand side of the Outlook window, select Options.

Selecting Options from the Fiile tab

From the window that has just opened, click Mail on the left side of the window.

Now click Signatures and click New.

Clicking New to create a new signature

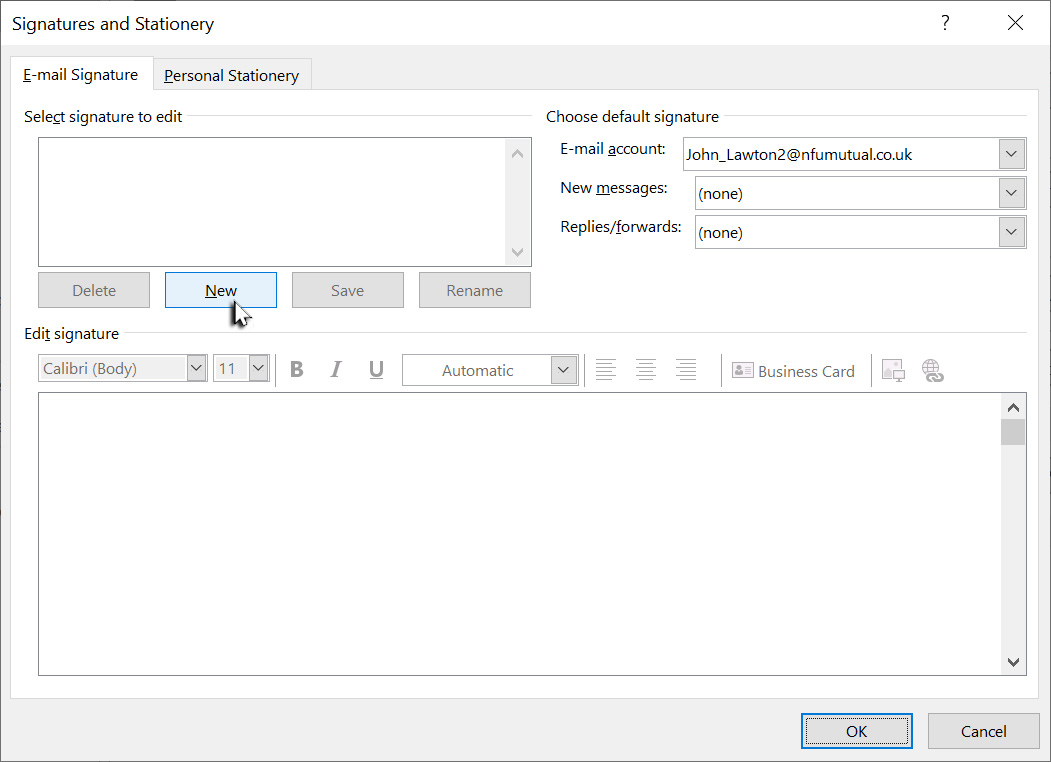
Give the signature a name and click OK.

Type your signature, following the NFU Mutual guidance, into the main text box and when you are done, click Save and then OK.

Click OK again to close the Outlook options window.

Now click New Email to create a new email message and make sure your signature is in place.

Clicking New to create a new signature

You can now discard the message and close Outlook.

Test your learning

Feel like you have understood this session? Great, take a moment to complete this these steps:

  • Launch Microsoft Edge using the correct taskbar shortcut.
  • Close Microsoft Edge.
  • Open the Start menu.
  • From the alphabetical list of available applications, locate and launch Word.
  • Close Word.
  • Open the Start menu and from the panel of tiles, launch Excel.
  • Close Excel.
  • Open the Start menu and create a taskbar shortcut for Word.
  • From the desktop shortcut, open the Recycle Bin.
  • Close the Recycle Bin.

Get started

Skip to next session

Page 7 / 23